

Streamlining Application Modernization with AWS Migration Hub Refactor Spaces
Posted on Sep 1, 2023 by Sitakanta Mohapatra


As organizations continue to evolve their applications to meet the demands of modern business landscapes, the need for efficient and incremental refactoring becomes apparent. I've taken a stab at modernizing a legacy PHP applications using AWS Migration Hub Refactor Spaces, enabling seamless integration into production environments. Let's dive straight into the intricacies of Refactor Spaces, its functionality, and how it facilitates the transition from monolithic to microservices architecture.
How Refactor Spaces works
Refactor spaces can be started with a single account; however, the recommendation is that you start with the following three accounts:
- One account for the existing application.
- One account for the first new microservice.
- One account to act as the refactor environment owner where Refactor Spaces configures cross-account networking and routes traffic
First, you create a Refactor Spaces environment in the account that you choose as the environment owner and then, you share the environment with the other two accounts. Then, Refactor Spaces automatically shares the resources that it creates within the environment with the other accounts. To do this, it orchestrates Amazon API Gateway, a Network Load Balancer, AWS Transit Gateway, AWS Resource Access Manager, and security groups. After you create a refactor environment, you create a Refactor Spaces application within the environment which contains services and routes, and it provides a single endpoint to expose the application to external callers.
Prerequisites
- Multiple AWS account (mandatory): 2 Accounts for this workshop.
- IDE of your choosing – To change code of the legacy application and point to new microservice endpoint.
Agenda
This workshop is conducted in 2 different accounts where one account is the owner of the Legacy application while the other account is microservice account.
First,we will cover monolithic applications. It is a traditional LAMP stack application (PHP Laravel version 5.1), which will be deployed on an EC2 instance and connect to MySQL database installed in the same instance.
Then, we will use Refactor Spaces to create a refactor environment to simplify routing traffic away from the legacy application to a new tasks microservice backed by AWS Lambda and Amazon DynamoDB. The DynamoDB table will hold the task data, and we will also deploy Lambda code which will replace the legacy task app functionality.
The Refactor Spaces, creates the following:
- Refactor Environment - A multi-account home for an application (we'll use a single account for the workshop, but as a best practice this would be multi-account).
- Application - Contains services and routes to them.
- Services - Business capabilities reachable via unique endpoints.
- Routes - Configurable resources contained within a Refactor Spaces application.
Architecture
The AS-IS architecture looks as follows:
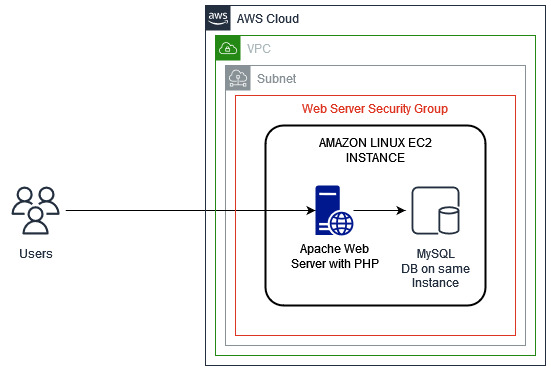
Figure 1: The As-is Architecture
The TO-BE architecture would not change the AS-IS architecture; however, we will use Lambda and DynamoDB to implement the Task microservice functionality in a separate account and link all of them through refactor spaces environment application.
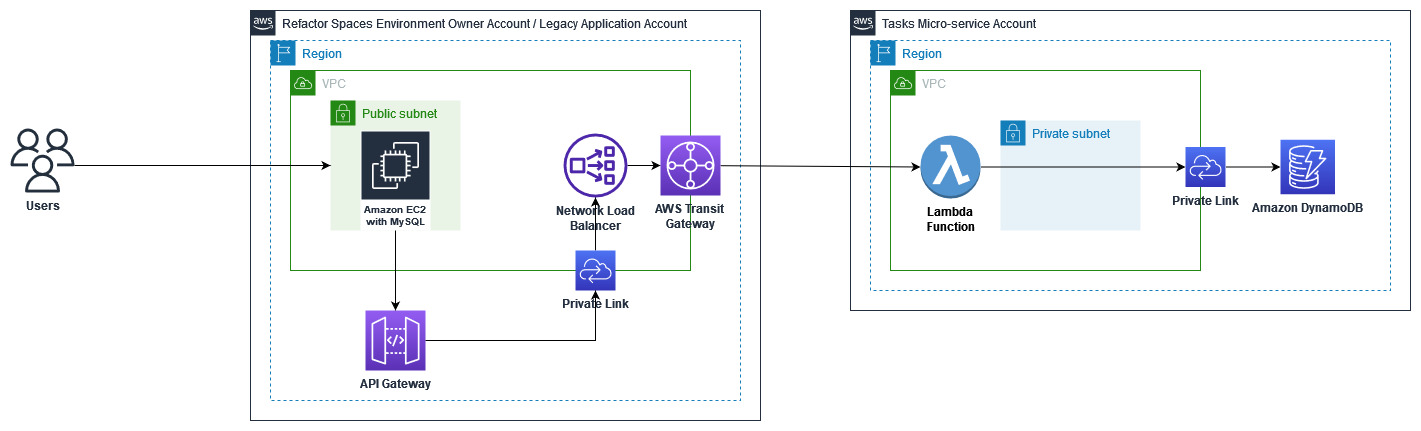
Figure 2: The to-be architecture
Note that – these are not the ideal infrastructure architecture for running highly available production applications but suffices for the purposes of this workshop.
Monolith Application
Our Tasks legacy application is a PHP Laravel legacy application (version 5.1) connected to a MySQL database which is installed in the same EC2 instance.
The app is deployed on a single EC2 instance within a VPC using a single public subnet. The EC2 security groups will be configured as "open to the world".
Below is a list of endpoint paths that the monolithic application exposes:
Register user: POST: [baseUrl]/register
Login user: POST: [baseUrl]/login
Get all tasks for a user: GET: [baseUrl]/get-tasks
Create task: POST: [baseUrl]/create-task
Delete Task: DELETE: [baseUrl]/delete-task
Logout: GET: [baseUrl]/logout
We are interested in replacing the monolith's implementation of the task functionality with our new microservice.
Deployment
To configure the infrastructure and deploy the application, we will use CloudFormation.
- Download the CloudFormation template from here.
- Log into your AWS console and proceed to CloudFormation.
- Create a stack and upload the template file downloaded from step a.
- Specify required details and parameters and provide necessary permissions.
- Submit and wait until the resources are created.
This will create one EC2 instance with LAMP stack, PHP Laravel version 5.1. This will be created inside the default VPC, in a public subnet.
Implement the Strangler pattern using Refactor Spaces
We'll use AWS Migration Hub Refactor Spaces to help us create an environment that enables us to replace functionality in the legacy application and route traffic to the replacement microservices (strangler pattern).
In this section we'll create the Refactor Spaces infrastructure which includes the Refactor Spaces environment, application, and proxy.
Environment
A Refactor Spaces environment contains the applications, services, and the AWS infrastructure used to refactor safely and incrementally. Refactor Spaces provides a unified view across multiple AWS accounts and simplifies multi-account use cases to accelerate application refactoring. By sharing the newly created environment with other AWS accounts, users in those accounts can create applications, services, and routes within the environment, unless you use AWS Identity and Access Management (IAM) to restrict access.
Create And Share Environment
- Log into your AWS account console which will be the owner of refactor spaces environment.
- Navigate to AWS Migration Hub Refactor Spaces.
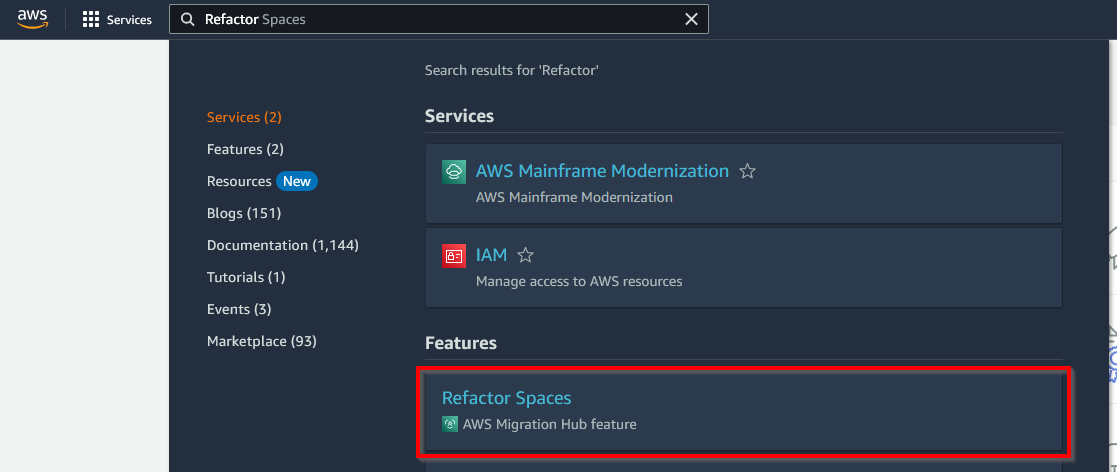
Figure 3: The Refactor Spaces navigation menu
- Select Environments from the Refactor section in the nav column.
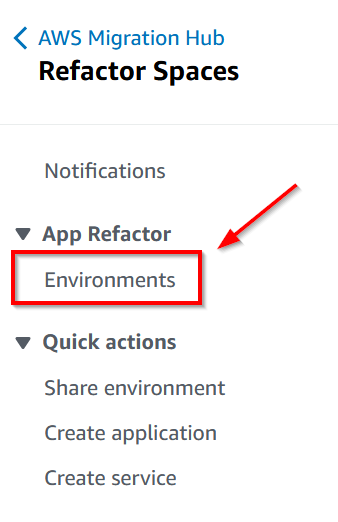
Figure 4: Refactor spaces left navigation column
- Create Refactor Spaces Environment
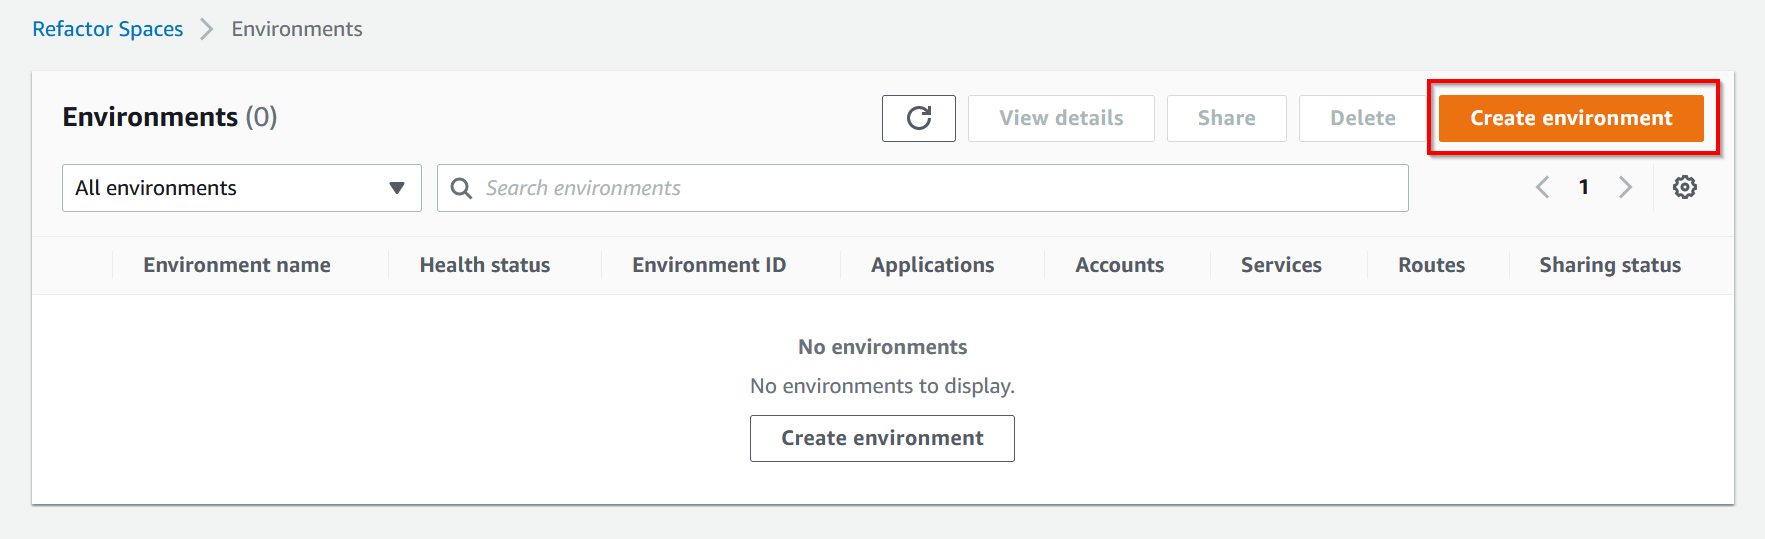
Figure 5: Create environment button
- Give the environment a name and check to provide a network bridge, as we will use 2 accounts. click next.
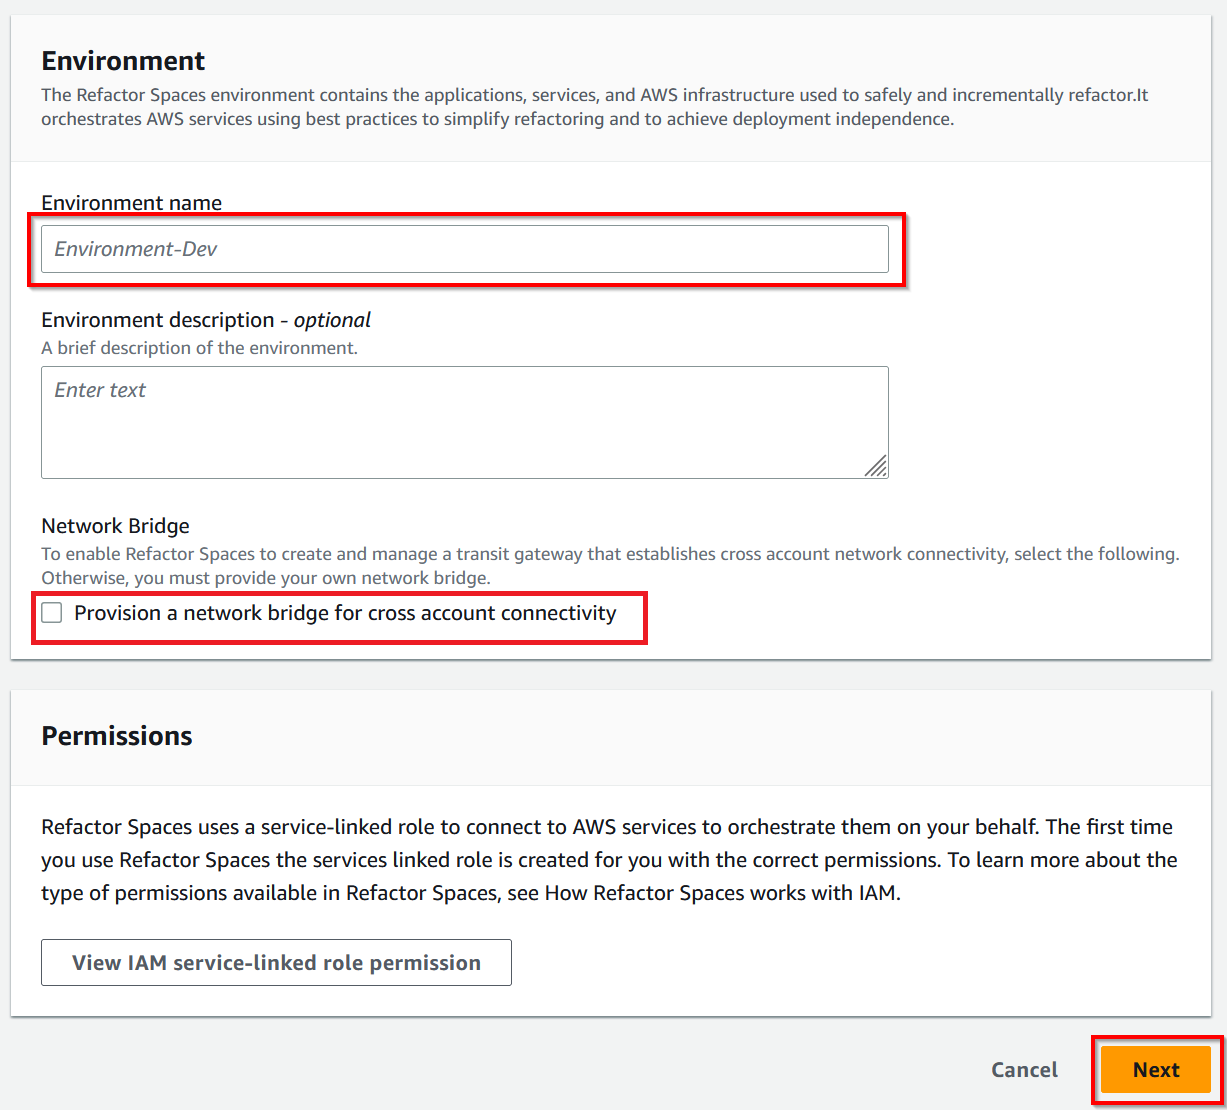
Figure 6: Environment details step
- Create a Refactor Spaces Application with the name "Task-App-Dev" and select the monolith's VPC ID.
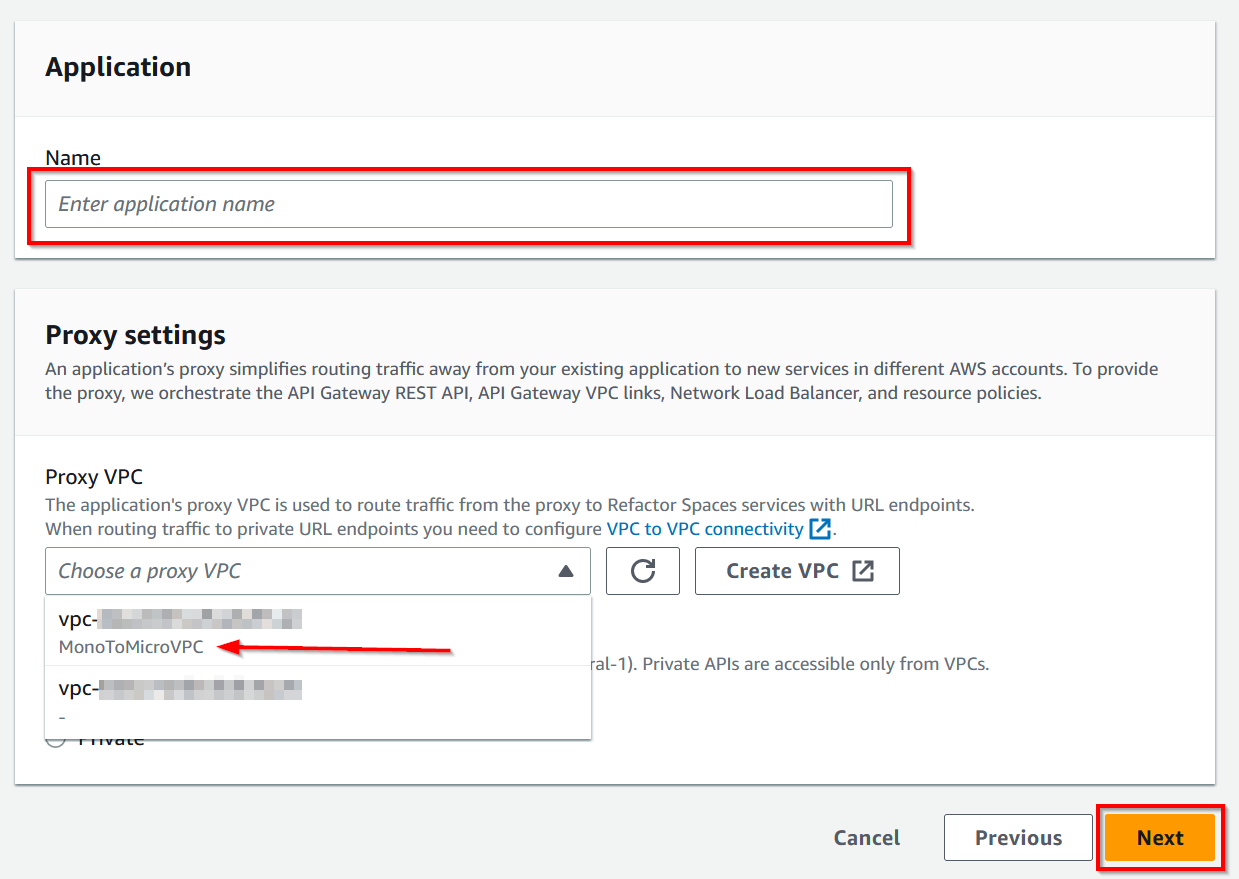
Figure 7: Application details step
- Shared environment configuration. Add account ID to which the environment will be shared.
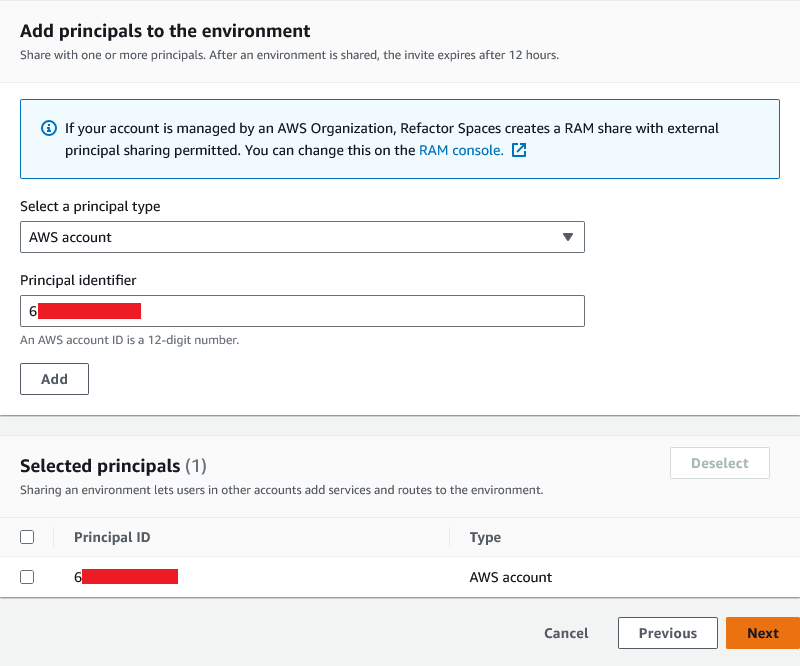
Figure 8: Share environment step
- Review and create the Refactor Spaces Environment.
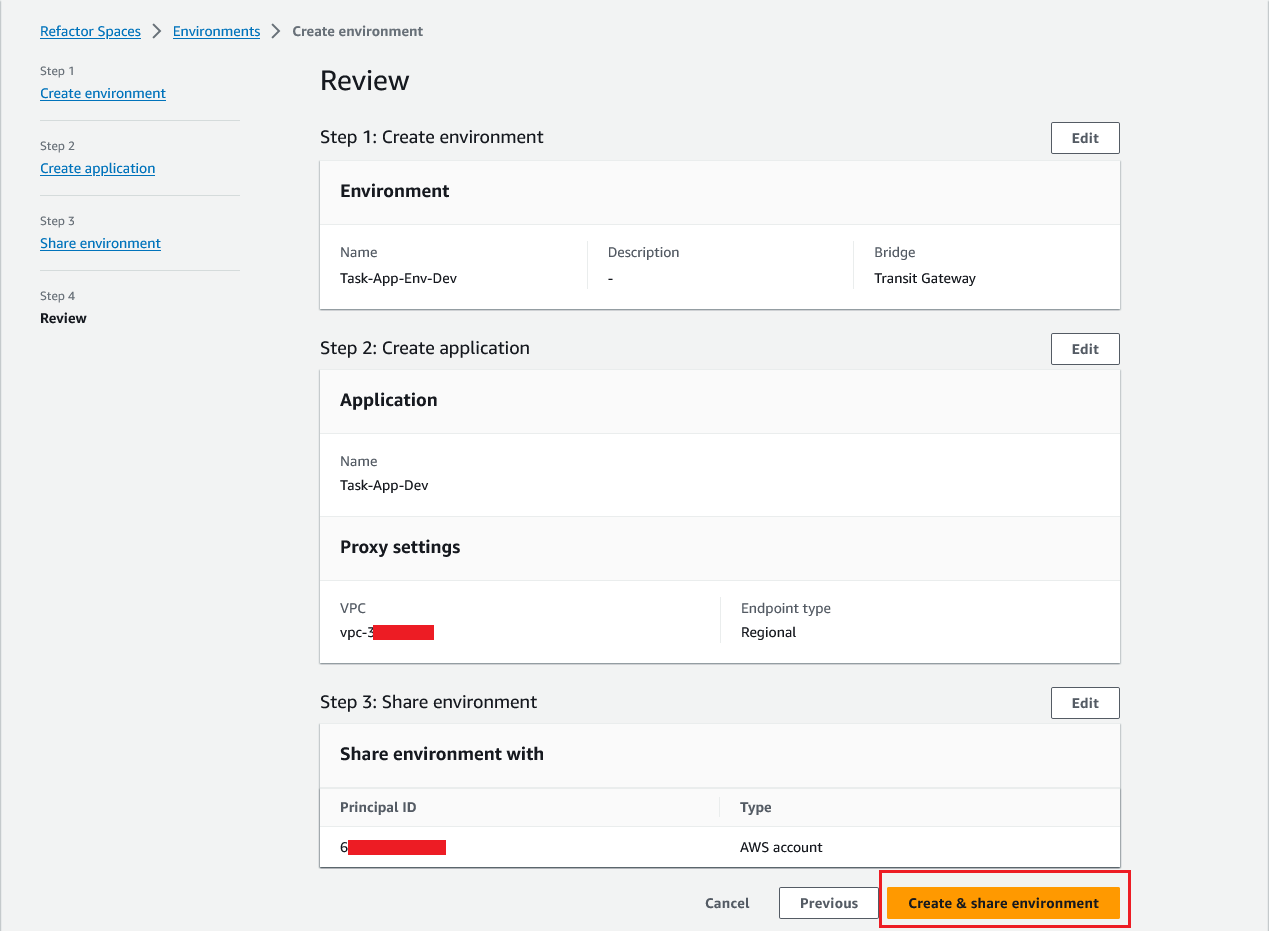
Figure 9: Review environment details
- The environment & application are now creating and invites sent for the shared environment to Account-2.
- From here on, Account-1 is Legacy App Account / Refactor spaces environment owner account. Account-2 is Tasks microservice account.
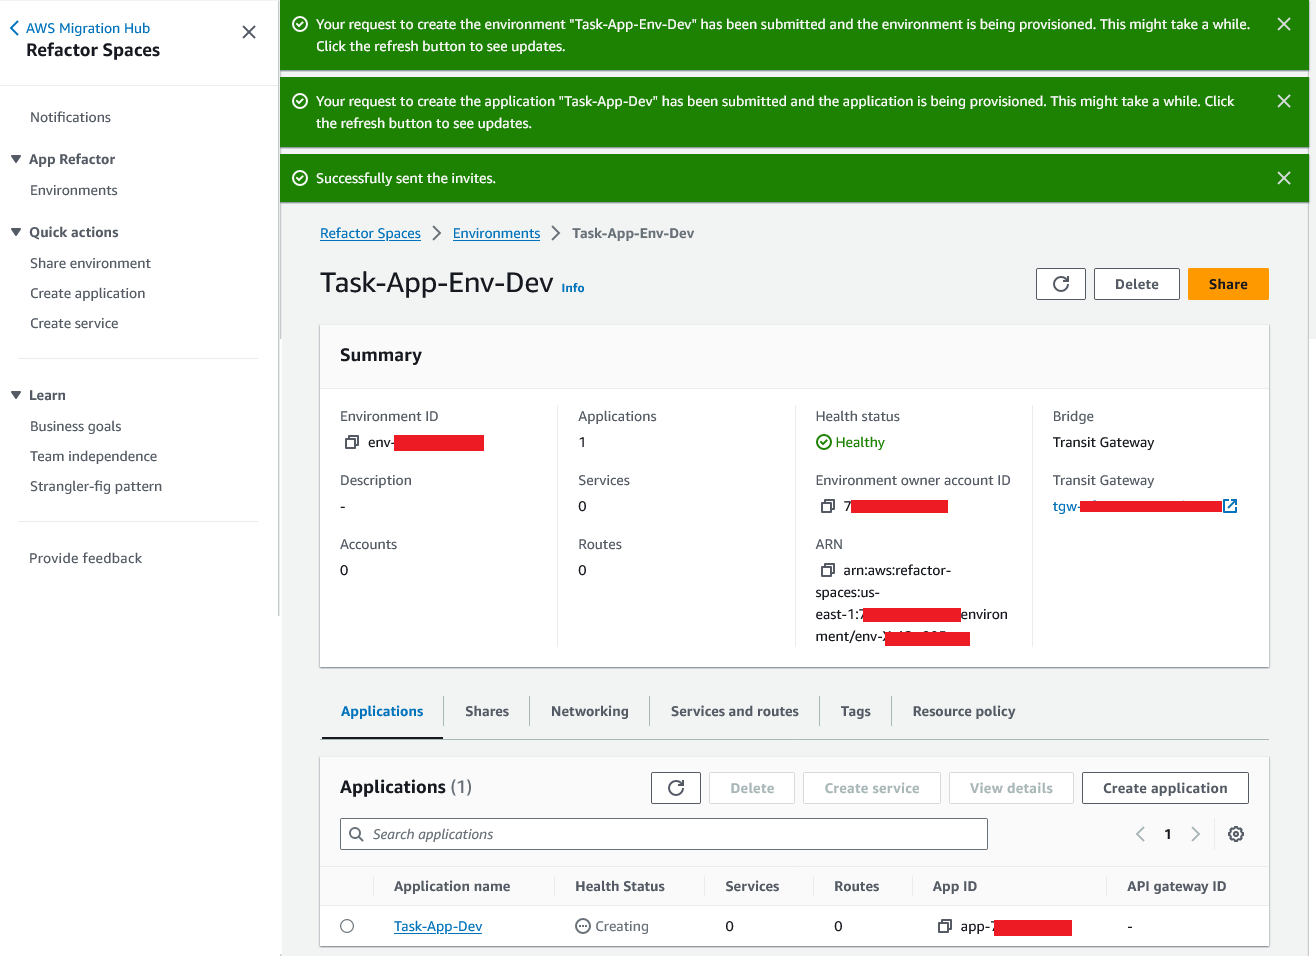
Figure 10: Environment created with application
Accept Shared Environment Invite
Environments are shared with other AWS accounts using AWS Resource Access Manager (AWS RAM).
- Login to AWS Account-2 console.
- Navigate to AWS Migration Hub Refactor Spaces.
- Select “Notifications” from the Refactor section in the nav column.
- Select the resource share name and “Accept Share”.
- Once the share request has been accepted, the account you shared with can view the Refactor Spaces environment from its AWS Management Console and can add applications, services, and routes to the shared environment.
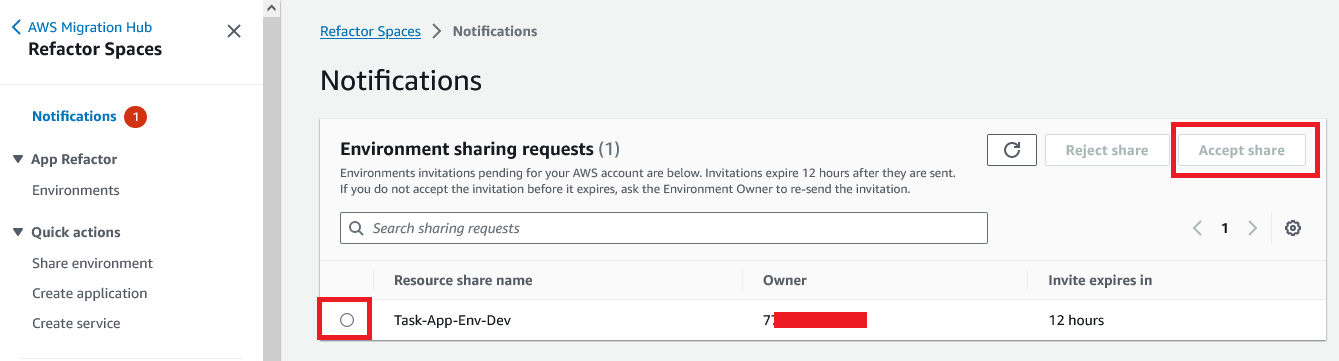
Figure 11: Shared environment notification
- Once the invite is accepted, check the application details page. You will notice there is no proxy created yet, because there are no services and routes created yet.
Application
We have already created an application while creating environment. However, there can be multiple applications under one environment. You can also create an application by choosing “Create application” under “Quick actions” in the Refactor Spaces navigation pane.
Lambda
As we are moving Task related APIs into microservice, the following 3 APIs need to be created in Lambda. The backend database will be DynamoDB. The CF template for lambda and DynamoDB is here.
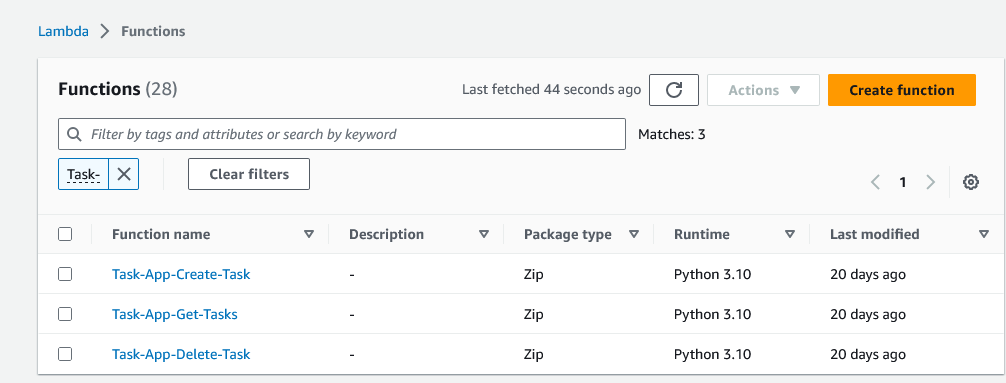
Figure 12: Lambda for task functionalities
DynamoDB
The tasks API will have a ‘task’ table in the DynamoDB with required fields.
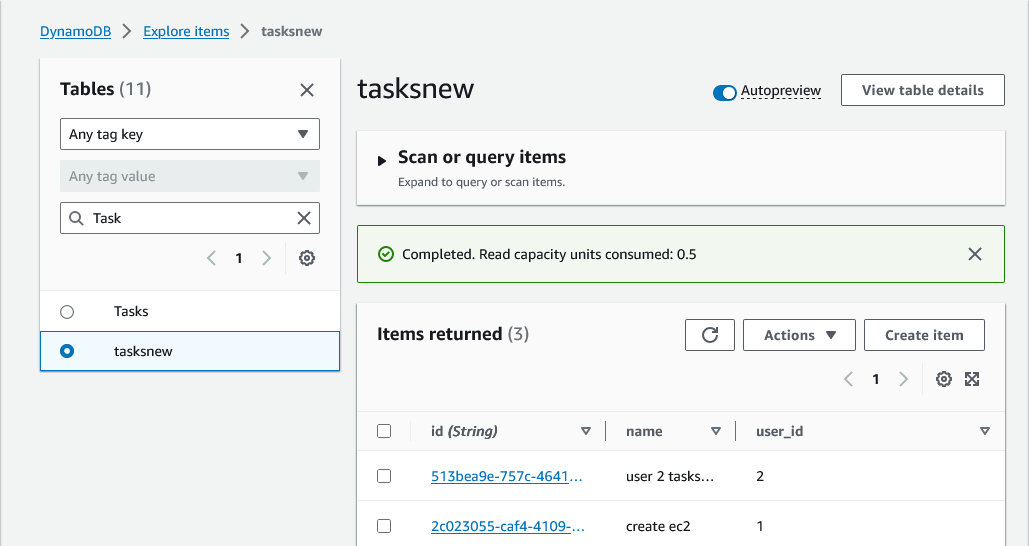
Figure 13: DyamoDB table to store task records
Service
Services provide the application’s business capabilities. Your existing application is represented by one or more services. Each service has an endpoint (either an HTTP/HTTPS URL or an AWS Lambda function).
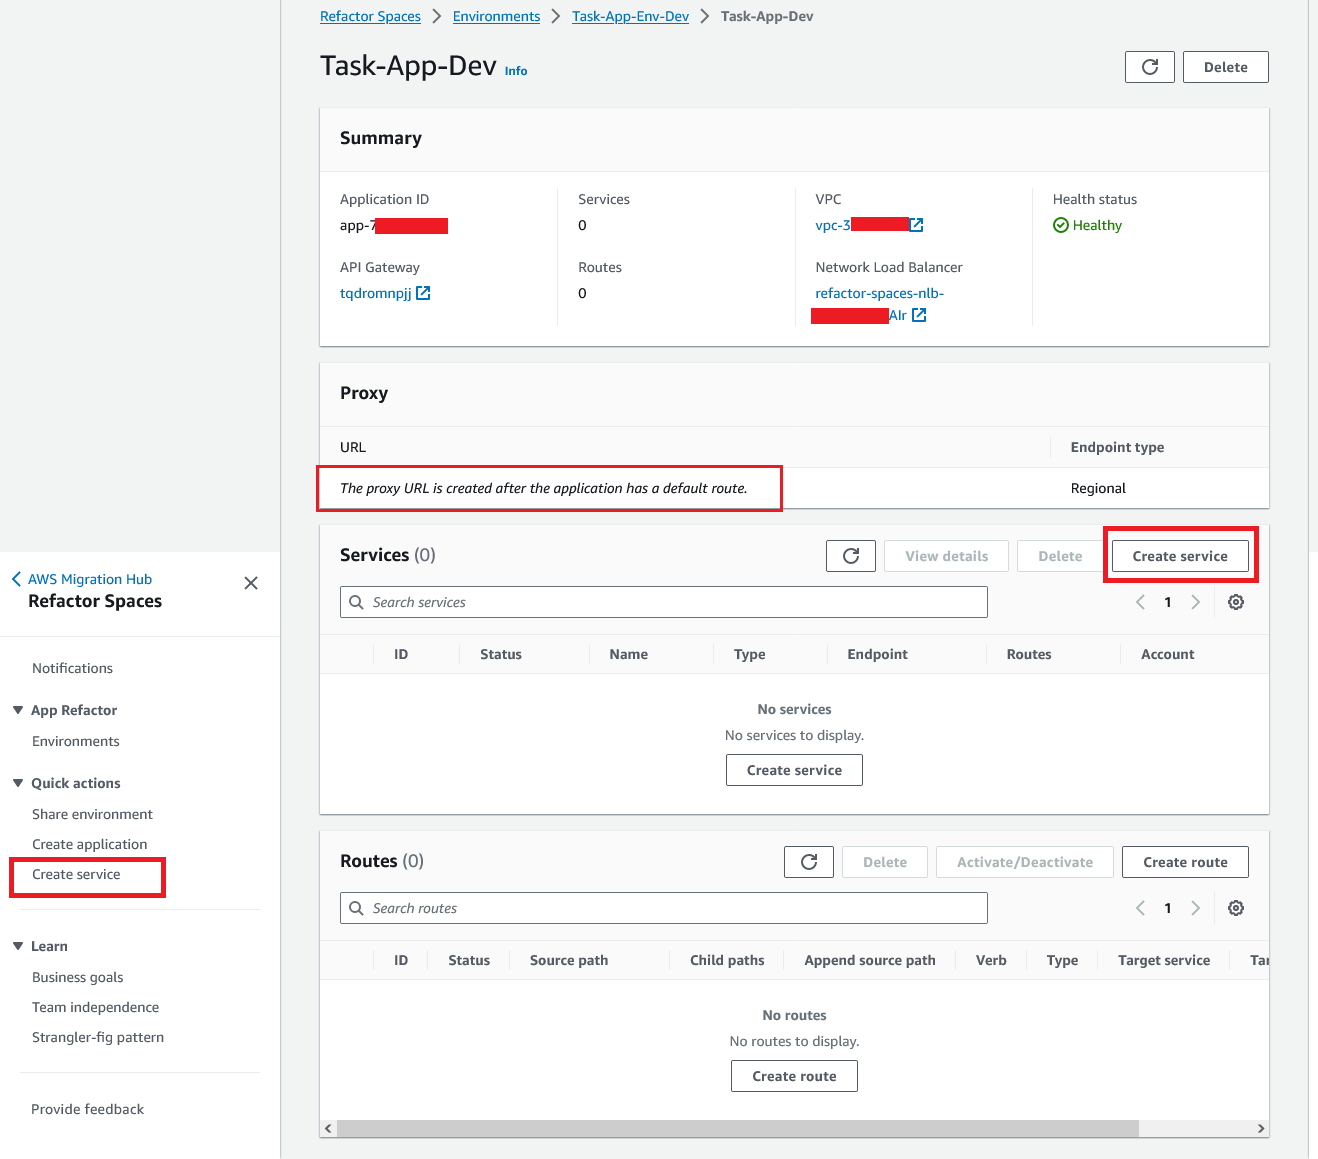
Figure 14: Application details and create service link
Create Service
We will be creating 3 services, each for one task API. So, we will link it to all the 3 lambda functions.
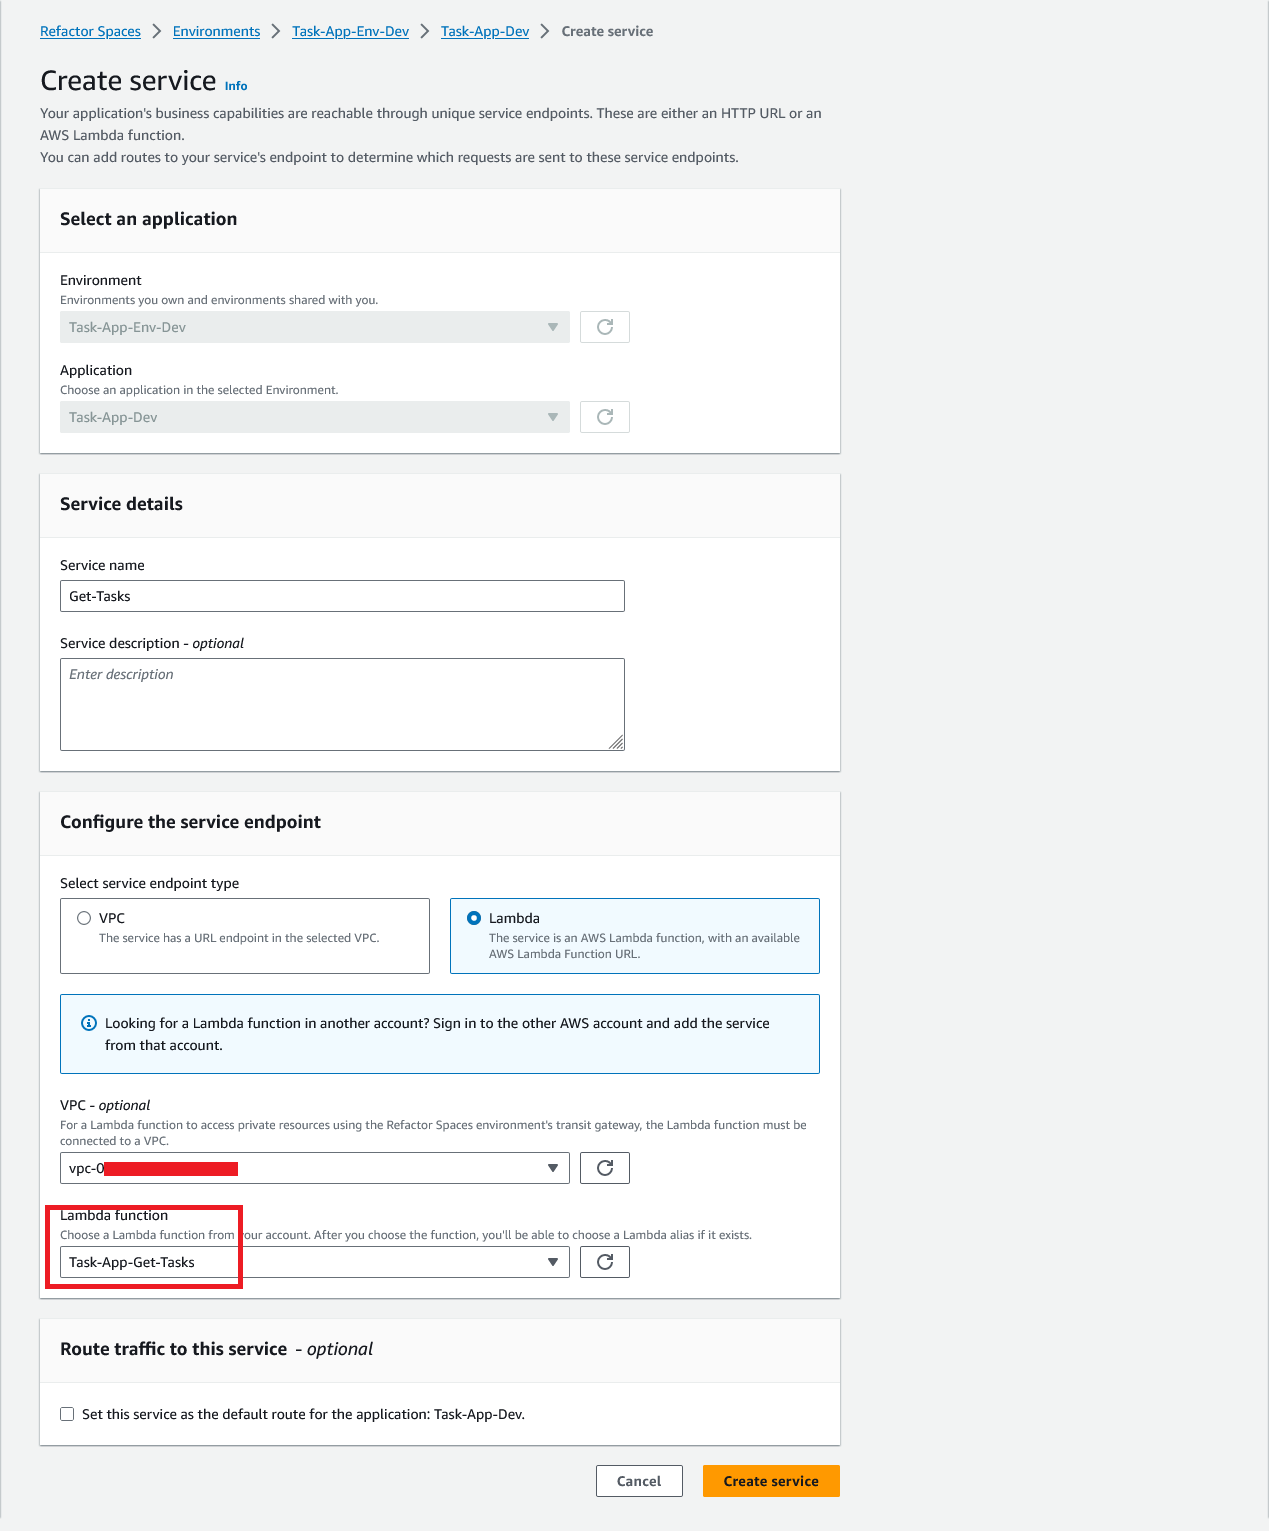
Figure 15: Create service step details
Similarly, we can create 2 other services as well.
Routes
To complete our setup, we need to add routes to our services. You’ll select an environment, application, and service when creating a route.
- Go to the service.
- Click on ‘Create Route’.
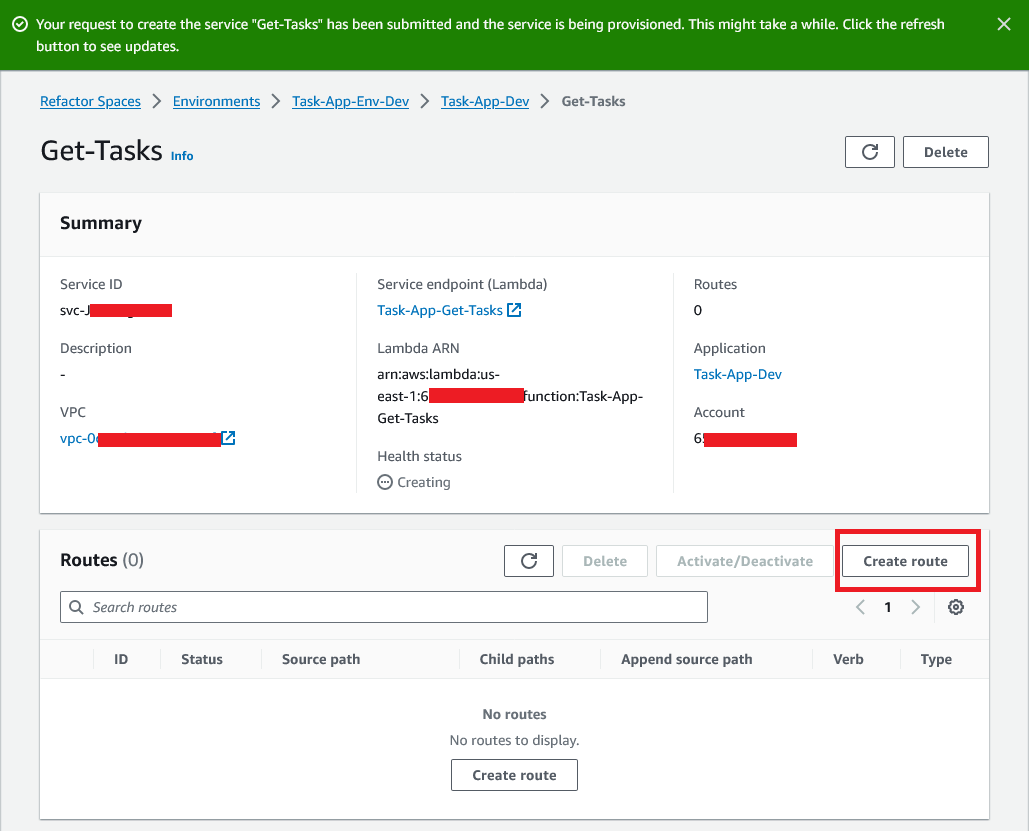
Figure 16: Get-tasks service details
- Create the route in an active state.
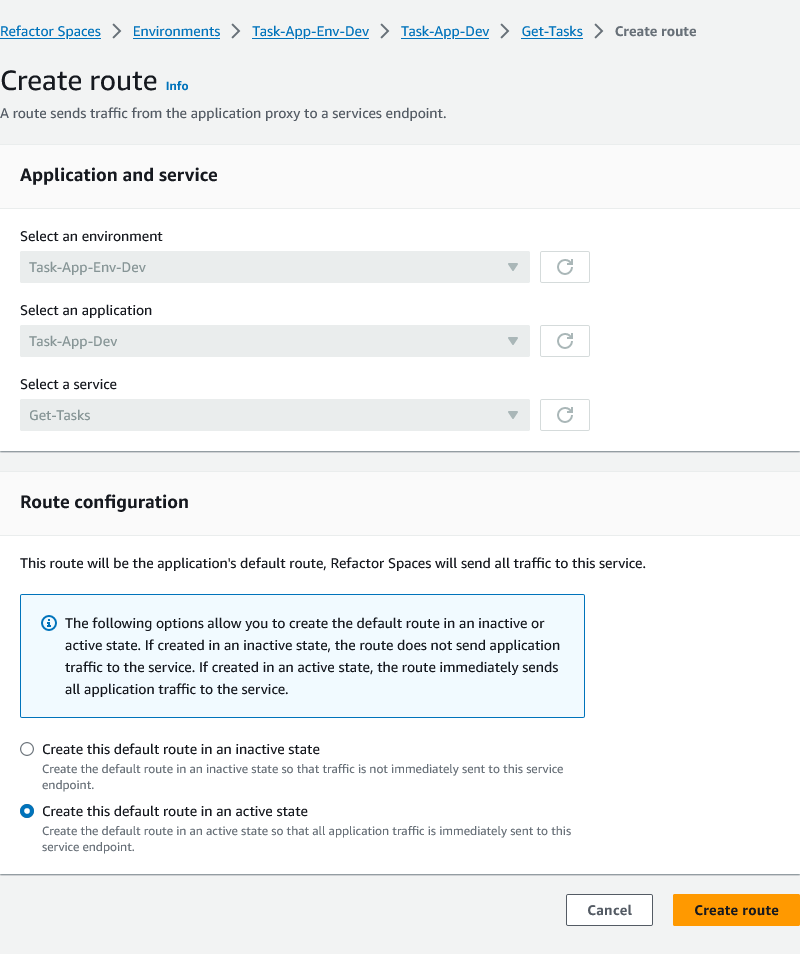
Figure 17: Create Route form
- Route is now being provisioned in the specified service.
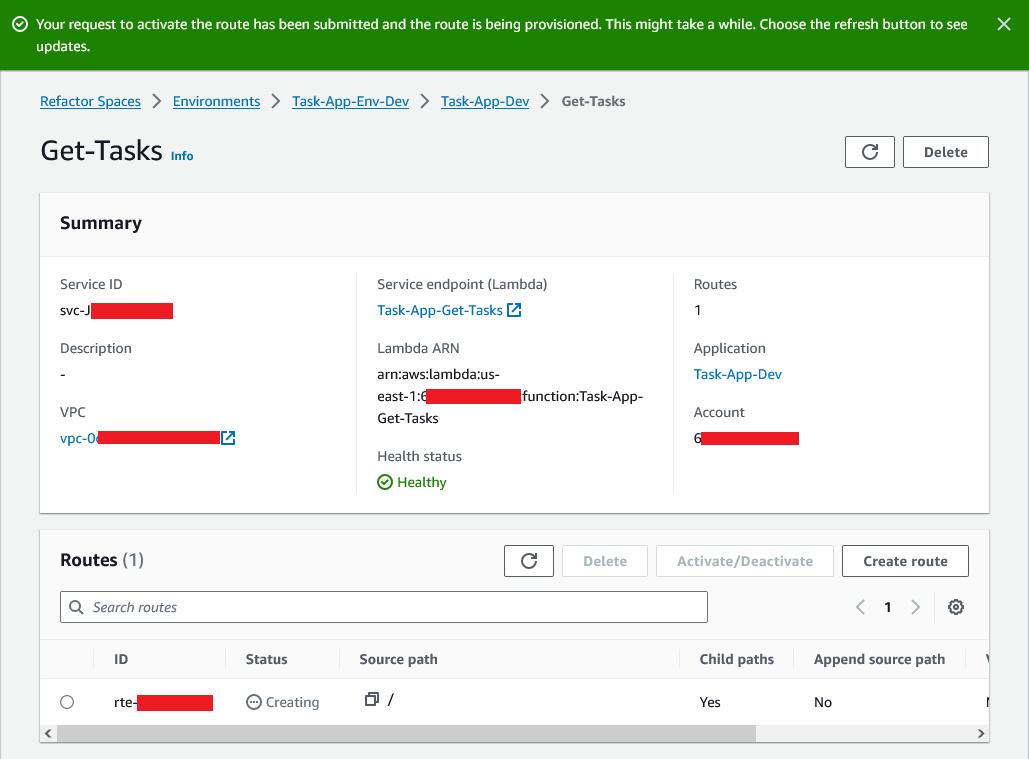
Figure 18: Route created for Get-tasks service
- Once a route has been created, come back to the application page and notice the proxy has been updated with an API gateway URL.
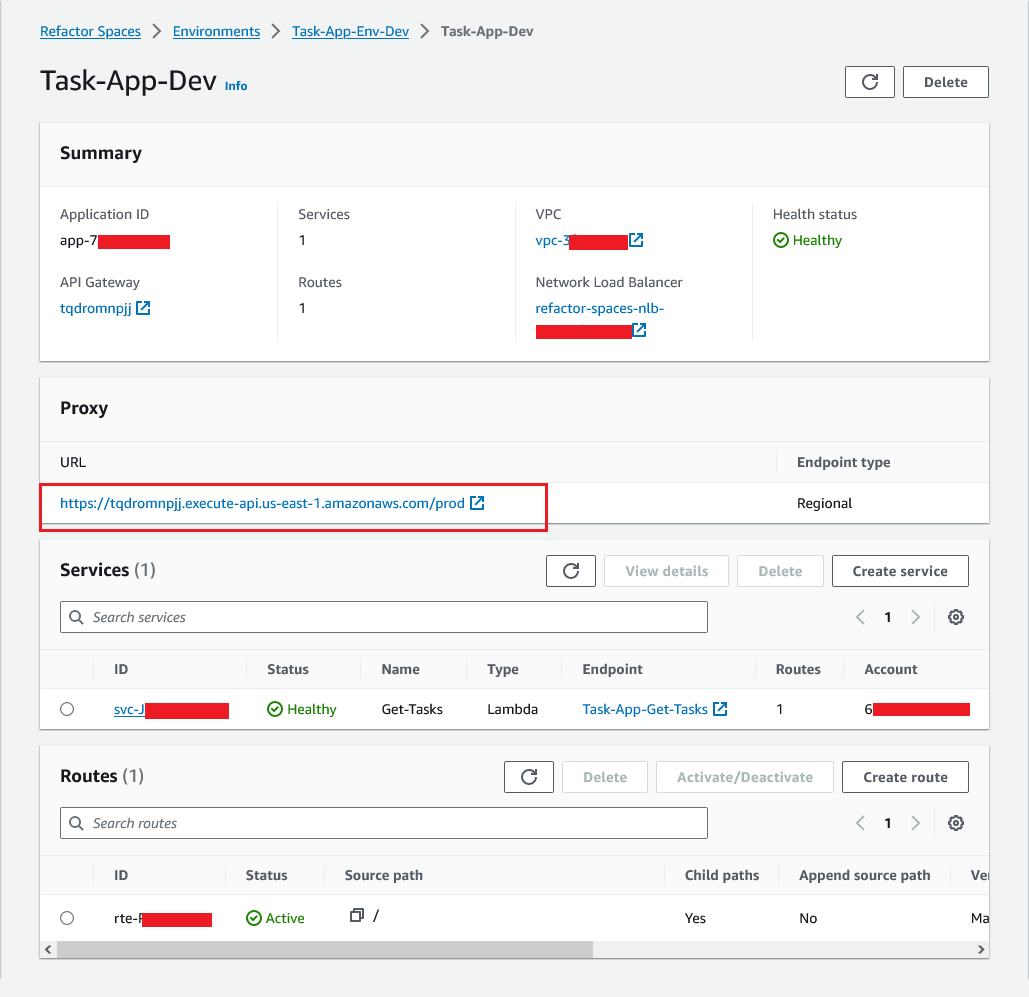
Figure 19: Application details after service and route created
- Now that ‘Get-Tasks’ service and route are created, follow same procedure and create - ‘Create-Task’ & ‘Delete-Task’ - service & routes.
- For ‘Delete-Task’ and ‘Get-Task’ we also need to pass parameters in the URL. For that, we need to configure the source path in the route configuration while creating route.
- For – Delete-Task parameter is ‘id’.
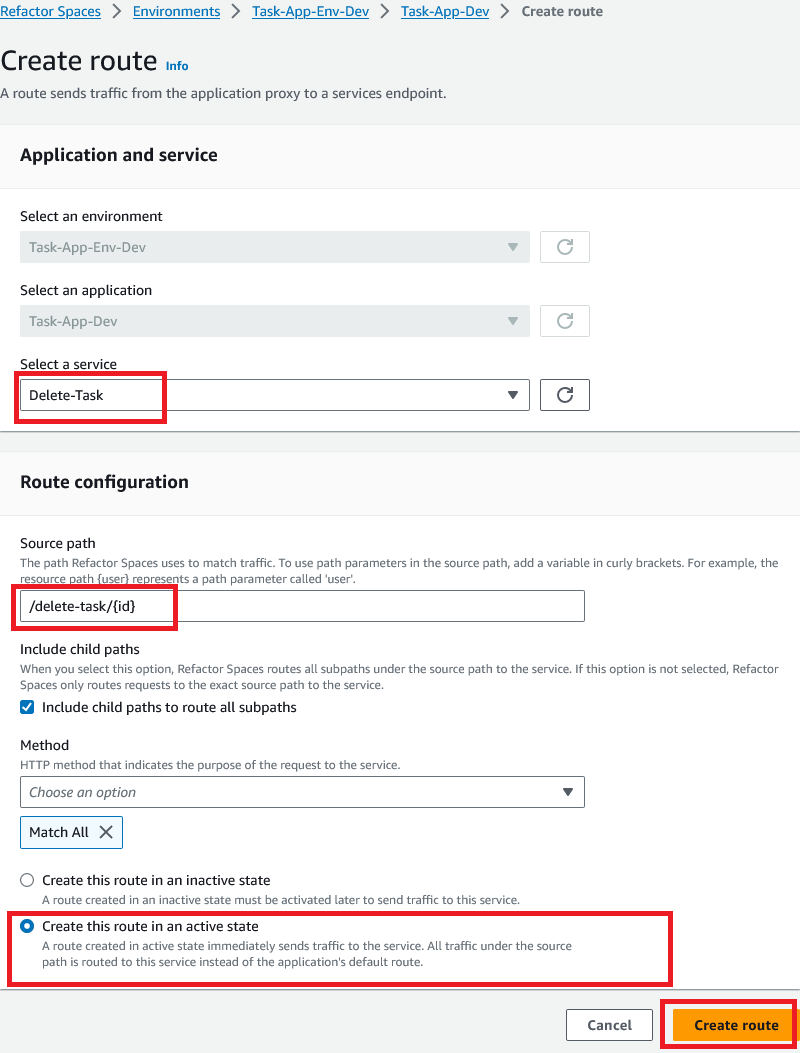
Figure 20: Passing parameters in the delete-task route
- For ‘Get-Tasks’, parameter is ‘user_id’.
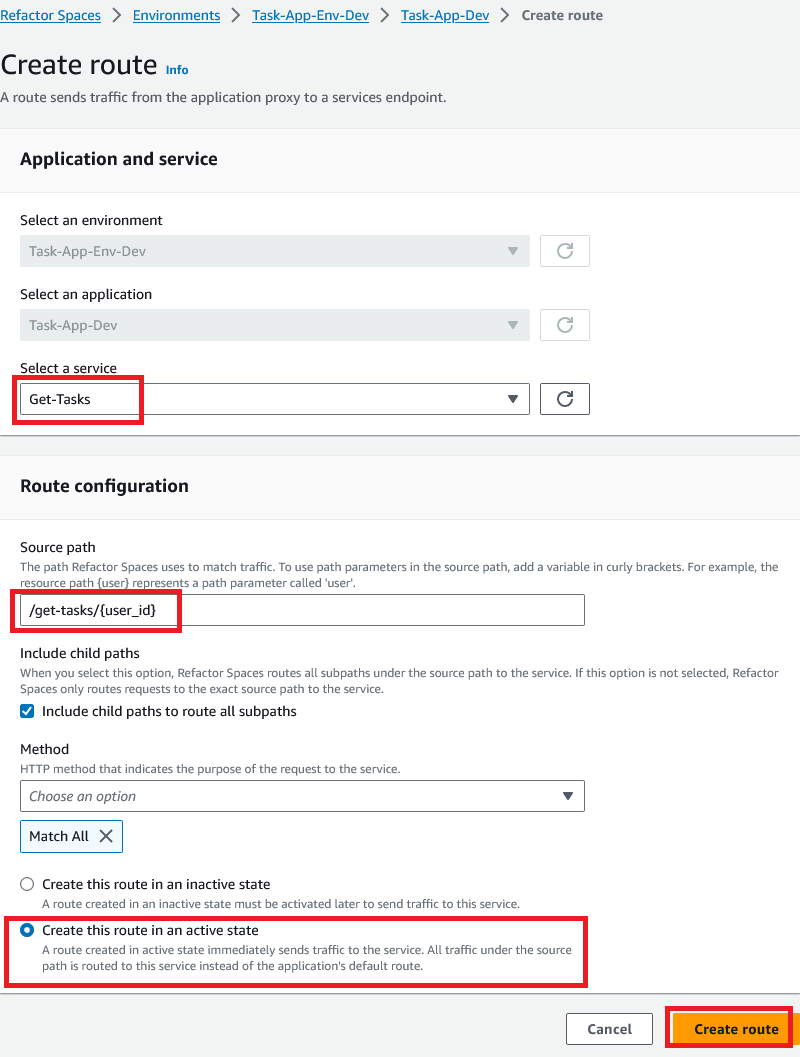
Figure 21: Passing parameters in the get-tasks route
Now all 3 services and routes are ready.
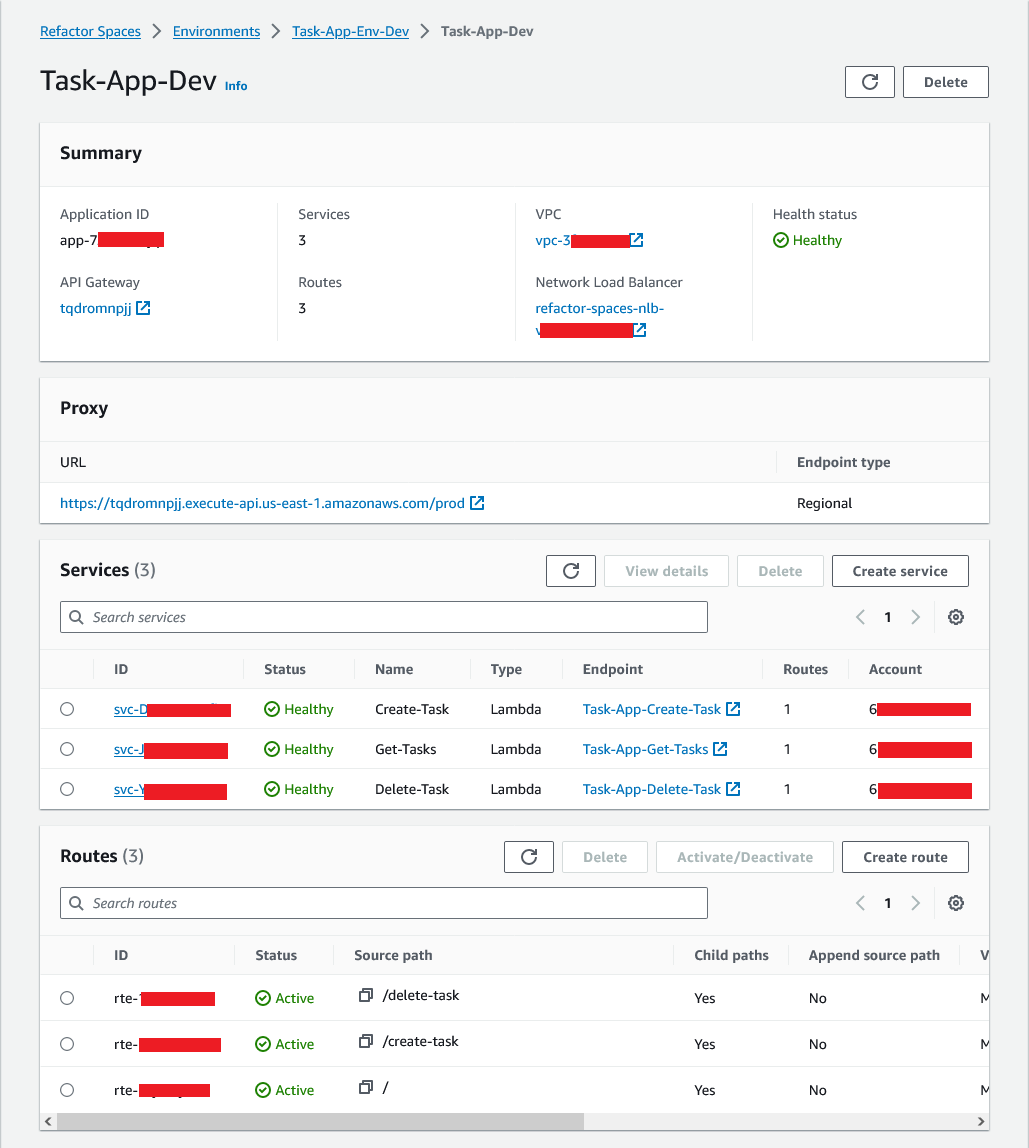
Figure 22: Application details after all service and routes created
Update Microservice URL in the application config
- Now that the routes are created for the microservice in the AWS Account-2, let's login to AWS Account-1.
- Login to the EC2 instance in Account-1, update the application code and config to point to the microservice API.
- For this workshop, the updated code is here.
- In the .env config file, the API link can be updated.
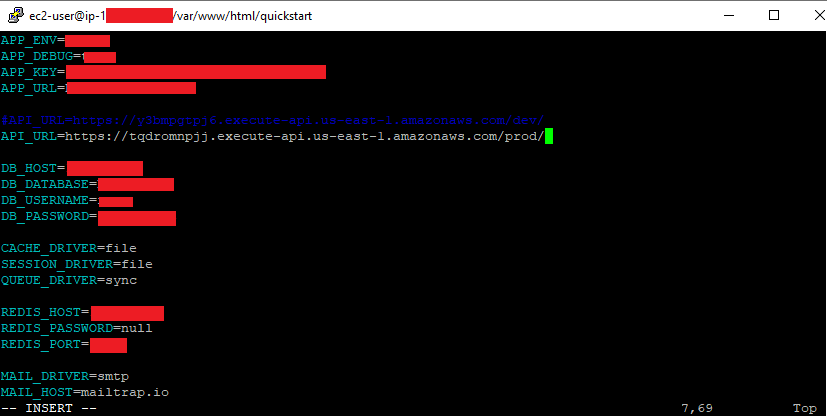
Figure 23: Tasks application config change to add API url
Test the Modernized Application
- Login to Task Application.
- Create a Task.
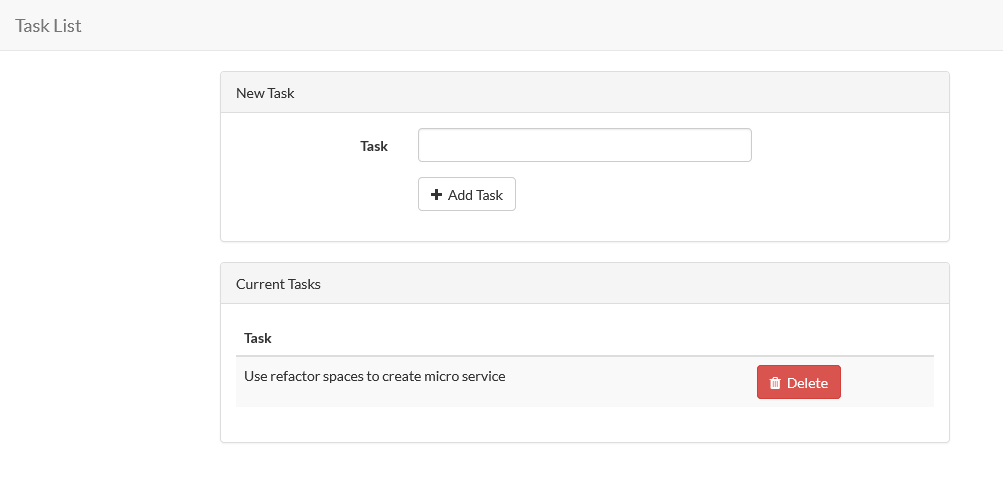
Figure 24: FE tasks UI
- Login to AWS Account-2 console where tasks microservice are hosted.
- Go to DynamoDB, open ‘tasks’ table.
- Check if the created task exists or not. If all is well, and no errors, then it should have created the task.
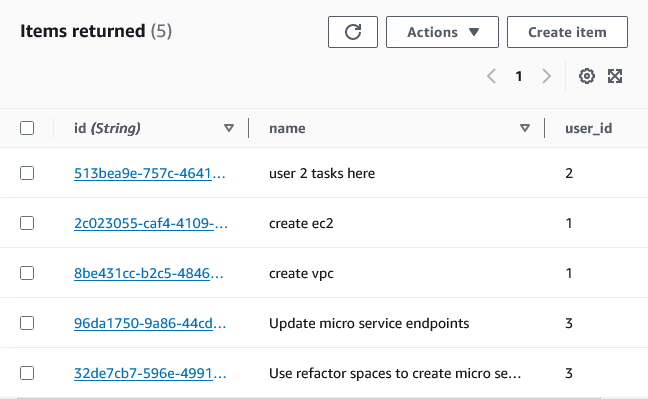
Figure 25: Database items returned for task table
Review
- First, we had a legacy PHP Laravel 5.1 application hosted on EC2 instance in the AWS Account-1. MySql installed in the same instance.
- Then we created a refactor spaces environment and application in Account-1 and shared that with Account-2.
- In Account-2, we accepted the invitation.
- Again, In the Account-2, we created tasks microservice. We had tasks functionalities written in Lambda and stored in DynamoDB.
- Then, we created services and routes for Tasks (get, create, delete) and added them to the refactor spaces application.
- Then the application proxy (API URL) and path was added to the legacy application code and config files. So, the legacy application now points to the new Tasks APIs instead of using the old Laravel code.
Delete Environment
If you would like to delete your Refactor Spaces environment, you will first need to delete the routes, services, and applications within the environment. Once the environment is deleted, the resources provisioned by Refactor Spaces (such as the Transit Gateway, Network Load Balancer, and API Gateway API) are also deleted.
Notes
Single Account vs Multiple Accounts
A Refactor Spaces environment can be made up of a single AWS account or multiple AWS accounts. While you can use a single AWS account (ideally for testing only), once you are ready to start refactoring, we recommend that you start with the following three AWS accounts:
-One account to act as the refactor environment owner, in which Refactor Spaces configures cross-account networking and routes traffic.
-One account for the existing application that you are refactoring.
-One account for the first new microservice.
Click here for a breakdown of some of the benefits of using multiple AWS accounts.
AWS resources provisioned when environment is created
When you create an environment, the following AWS resources are provisioned:
- Service-Linked Role
- Transit Gateway
- Resource Share in AWS RAM
AWS resources provisioned when application is created
When you create an application, the following AWS resources are provisioned:
- VPC Link
- API Gateway
- Network Load Balancer
- Security Group
AWS resources provisioned when service is created
When you create a service, the following AWS resources are provisioned:
- Transit Gateway VPC Attachment
- Route in the Route Table